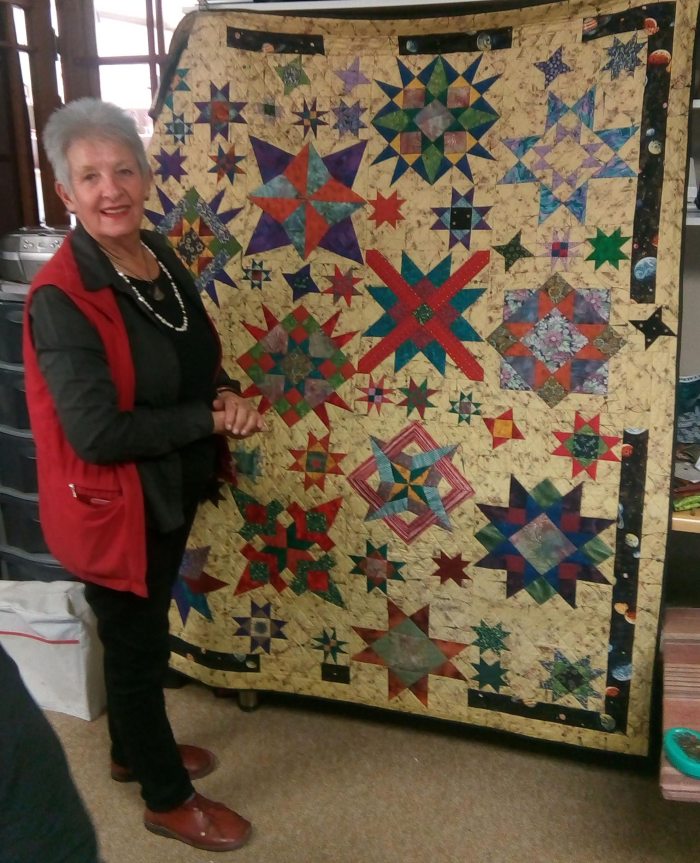
Not really. This week I did a workshop with star teacher Doortjie Gersbach and it was nose down and careful concentration. In two days we made two large stars (out of 13) and there was no time to look up at the sky and daydream. I have been quilting for 18 years and this is the most challenging stitching I have done. Here are my stars.


The workshop More Stars in the Sand was the fifth workshop I have done with Doortjie. Each time she delights and surprises us with her stories and with the new stitching tricks and methods that she teaches. And she comes to us. Grahamstown was her 46th (and last) stop on a three-month tour of the county with her husband Lochie. Each year they travel from town to town in South Africa to give prearranged classes. They come with a mobile shop and for us who live in small towns it is a real boon to be able to buy beautiful fabrics, notions and clever quilting aids – like a sandpaper board that keeps one’s fabric stable while drawing seam lines onto it.
Here are a few of the gems that Doortjie let drop during the star workshop:
- Don’t be afraid to use unexpected combinations of colours
- Use a lightly patterned fabric for the background, then the seam lines won’t show
- Repeat your zinger in different positions in the various stars
- Construct the quilt vertically. She pointed out that the human eye naturally moves along a horizontal line. So if the blocks are arranged vertically and staggered it will confuse the eye and woo the viewer
- Use different sized stars to add interest, and again stagger them
- Every quilt must have small prints, medium prints, and large prints
For those of you that are still reading, here are the technical details on the making of the two stars. The first block we made was the good old Ohio Star (pictured top, left) and that is not too difficult a block. Except that Doortjie taught us how to make it using templates. This meant first making the template, then cutting out each shape in fabric with a seam allowance, then drawing around the template exactly to transfer the shape onto the fabric, then precisely pinning the pieces together along the lines taking care to match the corners, then carefully machine stitching along each line in a set order. For this self-confessed slapdash sewer that was quite a challenge.
It didn’t help that I drew my lines on the right instead of the wrong side of the fabric. I did not want pale inside-out stars, so I redrew the lines and then had to rub out the pencil marks that showed once I had stitched the star together. The first step of choosing the fabrics for the Ohio Star took quite a while and then Doortjie unerringly advised me to swop them around. And she was right.
Then just as we were breathing out and thinking how clever we were to make an Ohio Star with this template method, Doortjie gave us a real challenge. She let us ride on our accomplishments and did not warn us how hard it was going to be to construct her Two-Colour Star. We soon found out! It then became clear why she had shown us how to use this template method. It would not have been possible to make this star in any other way. She had us producing prefect Y joins. This was for the points of the stars where the three triangles were made to meet by inserting the equilateral triangle into the notch between the two long thin triangles. Here are some snaps of the action:


Today I googled the Y-joint and learnt that it can be used to machine piece hexagons. According to the Craftsy site, most eight-pointed stars, tumbling block designs and machine-pieced hexagon quilts require the Y-seam construction. https://www.craftsy.com/quilting/article/easy-y-seam-tutorial/


It was a completely absorbing workshop. We were all so determined to construct that difficult star that we forgot about any cares or woes. Who needs a holiday when you can spend a day making a star with Doortjie Gersbach!
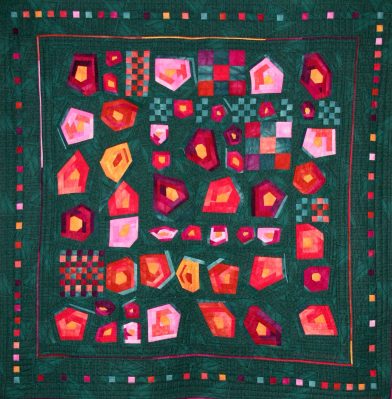
Here are photographs of quilts I made during two previous workshops. On the left is a double bed quilt called Patched and made using Doortjie’s “beerbox” method. For the Circles from Africa workshop I did not follow the guidelines of using bright African prints for the circles. Jammer [sorry] Doortjie!


Such a nice Fabrication, I am most envious of your beautiful stars.
LikeLike
We missed having you at the workshop
LikeLike
Sheer magic, Mariss!
LikeLike
Thank you Leela
LikeLike
The 2-colour star is beautiful!
LikeLike
Thank you for noticing and commenting
LikeLiked by 1 person
Sounds like a wonderful workshop and I appreciate the summary of lessons/tips learned! This made me want to go take this workshop!
LikeLike
Would have been wonderful to have you there!
LikeLiked by 1 person
This looks like such a great workshop… How lucky that Doortjie shows up on your doorstep every year! I also think the Circles From Africa design looks great in neutrals – very nice!
LikeLike
Yes, it was a good workshop and thank you for your comment on the circles quilt. Appreciated.
LikeLike
Beautiful stars, Mariss. I like the black background – it’s very reminiscent of a night sky, and orange and violet make a great pair! Glad to read about this delightful workshop. 🙂
LikeLike
Thank you for noticing the brash colour choices. Yes, it was a great workshop. (Doortjie is also a very accomplished crocheter and she inspired me to start crocheting a Sophie’s Garden square on the side.)
LikeLiked by 1 person